Code with Legos, Beads, and Pixels!
Last summer I returned to the BLC conference in Boston and shared the work I have been doing in coding and robotics with my early childhood students. One of the hardest parts of presenting at conferences is receiving the feedback forms afterwards, luckily most of the comments I received were very positive. However, there were a sprinkle that basically said they couldn't follow my presentation because they still didn't understand what coding was. This forced me to reflect a little bit on how I was defining coding to these early childhood educators. I needed to revamp that explanation and share these ideas in a way that early childhood educators could understand. Through this reflection I realized that in most of my coding lessons, I was teaching my students to think like a computer or robot. Ultimately, we were role playing with kids in as many different ways as possible. In the same way that we try to find new and interesting ways for students to explore letters, for example, I was trying to find and demonstrate a variety of ways that young students could be in a situation where they were role playing either giving commands or receiving commands, with an understanding that robots have no powers to interpret information. Robots and computers directly follow instructions you give them, nothing more, nothing less. Recently I've found a couple more ways to role play the basics of coding and that's what I'd like to share here in this post.
Basic Binary
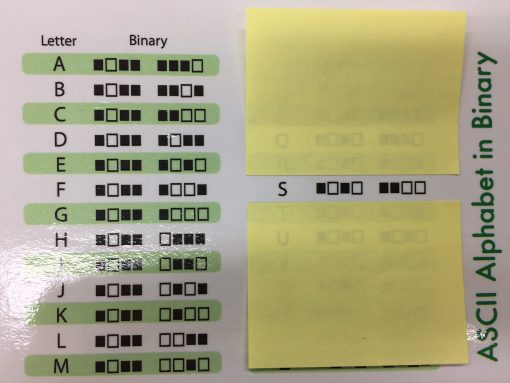
I found Binary Baubles by Code.Org and used the ASCII Alphabet from this activity. I explained to my students that sometimes computers and machines communicate with just two codes, "on" and "off". Normally binary consists of 1's and 0's representing these on and off switches, however, in Binary Baubles it is recommended not to use the traditional 1 and 0 in binary code with young learners because they are still developing their number sense and this could confuse them. Here is the ASCII Alphabet provided in Binary Baubles:

With each letter being represented by a series of 8 'on' or 'off' switches/codes, we can begin to spell words using binary code! The truth is that upper case and lower case letters have their own combinations, however, for now, I stuck with the capital letters only.
Name Necklaces
In kindergarten we practiced using the ASCII Alphabet to spell our names and used beads to create a binary name necklace. The students were allowed to choose one color to represent 'on' another color to represent 'off' and finally a third color to act as a delimeter, or a space between characters. This helped them to check their work because it was easier to see where one letter ended and the next began.
First, I used the binary coloring strips from Binary Baubles and had students create the letters in their name by coloring in the spaces correctly. They glued the strips down in order:

Some students had trouble focusing on each letter in order to copy it, so to help them I used little sticky notes above and below the letter they were copying to help them find their place quickly when going back and forth between the strip they were coloring in and code card.
Once they completed their names, I gave students individual cups. I used this opportunity to have the students practice 1:1 counting. First, they looked at the first letter of their name and counted how many 'on' switches there were, they then collected the corresponding number of beads (in their chosen color) into their cup. Next they counted the 'off' switches in the same letter and then collected those in a different color. Finally, they lay out the beads ON TOP of the paper strip to help ensure the beads went onto the string for their necklace in the right order. At the end of each letter we had them place a third colored bead as a delimeter so it would not be forgotten.

The result is a lovely necklace which spells their name in binary code.
Lego Words
Using the ASCII Alphabet cards again, I had students in both kindergarten and first grade practice spelling words. This idea could be used to reinforce sight words, high-frequency words, or perhaps spelling patterns and word families.
In the same way that students chose two colors to represent the 'on' and 'off' switches for the beads on the necklaces, they chose two different colors of Lego. I told students that color matters but size does not, so they weren't too limited by the pieces that I had in my tubs. I also told them to stack the letters from top to bottom and leave spaces between to act as the delimeter. Here are a few examples.
This student spelled the word "car":

And this student spelled the word "done":

Pixel Art Coding
Some of you may be familiar with Graph Paper Programming by Code.org, for those of you who aren't, the concept is pretty simple. Students work in pairs with one partner being the robot and the other being the programmer. The objective is for the programmer to write a code that the robot will follow to create a chosen pattern on a small piece of graph paper. The code consists of a series of arrow commands:
The programmer uses these arrow codes to write a program, and get his or her partner to color in the correct squares to make a chosen pattern.

I realized I could extend this idea (and waste less paper) by using a spreadsheet. I narrowed the cells into squares and used the fill function in Google Sheets. Initially, I gave students programs which if followed correctly, would form simple images on the spreadsheet. These are the challenges I gave my second grade students along with the solutions so you can see what image each program is meant to make.
Be warned, the last one is tricky! I probably didn't write the the program in the simplest or most efficient way, if you work with older kids, I challenge your students to write me a program to make the sword that is simpler and shorter than mine! ;)
My students worked in partners and I printed out the challenges for them. Initially I just had them check off each line of code as they completed it directly onto the paper. I quickly realized I could save myself from printing new sheets for each class by putting them inside a plastic slip cover so students could tick off each line of code using whiteboard markers instead!
If the students managed to complete all three challenges, they were then given empty graph paper, asked to create images and then figure out the code for it!
When I tweeted out pictures of this activity, not only did I get positive responses from my PLN, but some took the idea and extended it further! Frank Hua in Ho Chi Minh, created an awesome Ninja Turtle image on Sheets and then gave it to one of his 6th graders to write the code! I believe he then used the program created by this student with his elementary students. Here's the awesome creation by Frank and his student! You can also find this challenge and my challenges on the #KidsKodeX G+ Community.
