Animals and Habitats: 5 Lessons Integrating Technology and Robotics
In first grade, our students go through a science unit on Plants and Animals. Part of this unit involves the students studying animals, their habitats and what they need for survival. On the other end, our Technology curriculum involves Robotics and Lego WeDo is a part of how we meet our standards in the first grade.
So, I thought, why not just combine the two and hit two birds with one stone? Along the way we also integrate technology in other ways such as using it as a research tool and also sharing our learning through blogging.
Preparing the Robots
Screen shot 2015-06-02 at 1.43.09 PM
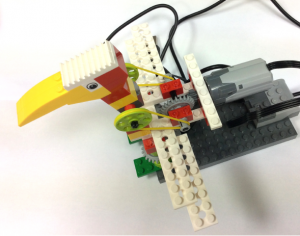
There are three animals from the 'Wild Animals' pack in Lego WeDo, the lion, alligator and bird. We wanted to make all the animals "eat" when given "food" so this meant replicating the setup of the alligator with the use of a motion sensor. This way whenever we placed something near the sensor the animal would react.
We had to completely redesign the bird so that it's head would bend forward and backward, and placed a motion sensor between its feet. We kept the lion the same and simply added a motion sensor to the lion (under its chin) rather than attaching a tilt sensor.
Lesson 1: Research
Each class was divided up into pairs and each pair chose an animal they would study and eventually build with Legos. They were given two options for researching:
1. KidRex.org
There are plenty of other kid safe tools for research out there, I just decided on these two to keep things simple. YouTube Kids offers a voice search option so it eliminated typing. As for Kidrex, I taught the students how to:
Skim text and headings for possible pertinent information
Highlight text and make it read the text to you
Using Chrome on a Mac you can highlight text then 'control'+ click to access 'speech'
There are also many Chrome plugins that you can use
This lesson tapped into some speaking and listening skills. In order for YouTube to recognize your search it was necessary to speak clearly in short search phrases. As for Kidrex, students had to listen carefully for the information they were searching for.
With their partners they had to fill in this sheet and find out as much as they could about their animal's diet and habitat.
Download these sheets:
[wpdm_package id='892']
Lesson 2: Build Your Robot & Explore

IMG_0814
During the second lesson students followed photo instructions to building their animal using the Lego WeDo kits. Once they had finished putting their animal together we plugged them into the computers and challenged students to begin playing with the programming blocks to see what each did to the robot. This part was not guided and gave students a chance to explore the program. Not all the students reached this stage in the lesson and needed the entire class to build their animal.
Lesson 3: Build Your Habitat

Habitat
Lesson number three could be defined as less "techie" depending on how you view technology integration. Students worked with their partners to design and create their shoe box habitats using 'technologies' like scissors, tape, pencils/pens, glue, and spare Lego pieces. Old children's magazines worked great for this project!
They were given their research sheets so that they could include the right elements and foods into the habitat.
Lesson 4: Programming Your Robot
I had two goals for every group:
1. Make your robot move when 'food' is given. This meant:
The alligator's mouth would close, wait, open, then wait for more food
The lion would sit down, wait, stand up, then wait for more food
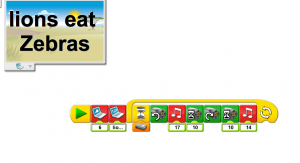
The toucan would move it's head downward toward the food, wait, move back upright, then wait for more food.
2. Make a sound somewhere in the program. This could involve roaring, chewing, chirping and so on. There are 20 sounds built into the WeDo program.
If the groups managed all of this they were then challenged to:
3. Have a background of the habitat pop up on the screen
4. Have a fact about their animal appear on top of the habitat picture

Photo May 25, 8 35 12 AM
Students learned about how to use the motion sensor in the program in order to sense movement, or the 'food' being given. They also learned how to use the 'repeat' block in order to make the animal always respond to food being given.
Students also had to work out how long to turn the motor on for and at what speed or power because leaving it on for too long meant their animals started to fall apart! This incorporated a lot of testing to get their programs just right! Here is an example of a program the students put together. This particular group included two different sounds in their program, a chewing sound and a roar.
Screen shot 2015-05-18 at 1.01.10 PM
Lesson 5: Gallery Walk & Blog Post
The fifth and last lesson in this series ended with some sharing and reflecting. The students went around and looked at each other's habitats as well as programs. They noticed similarities and differences, which sparked them to ask questions about how their peers programmed their robots to do certain things. After about 15 minutes of this. The students all sat down and wrote a short reflective blog post about their experience.

2015-06-03_8-36-35
There you have it! Integrating technology and robotics into our first grade science unit :)