What's Inside?
A Focus on Thinking
This year I wanted to allow my Pre-K students to explore technology in a way that they hadn't before, by taking it apart. I asked my school's IT department to save me a few old machines that were no longer in use the summer before this school year began. Before beginning the journey with my students, I thought about what types of thinking I wanted the children to get out of the experience. Here are the ideas I outlined:
- To be able to observe and describe things they saw, noticed, or felt (with some links to curricular learning such as colors and shapes)
- To make comparisons and ask questions about what they discovered or observed
- To learn about the functions of major parts of a computer
Inquiry can happen in a multitude of ways, it can be structured, guided, student-led, etc. In this instance, I felt that having some guidance and structure would help my young learners reach these thinking goals.
Setup and Structure
I only have 30 minutes with my Pre-K classes and I rarely do whole group activities. Instead, I pull small groups of 4-5 students so I can focus my attention on the students that are with me as well as provide facilitation as needed. For this particular activity, I only had each group for about 15 minutes which meant it took me two 30-minute lessons to get through the entire class. As each small group rotated through the first round, they took the computer apart a little at a time and made observations. All I really needed for this were some screwdrivers. Students shared observations, wondered about functions of parts they saw, and made predictions. Here are a few initial posts on Seesaw about what they were noticing:
Sorting and Connecting
In the second round, the computer had already been entirely taken apart, so I wanted students to begin making connections by thinking about how to sort these parts into groups. It just so happened that the Pre-K classes were learning about colors, so many students chose to sort the various parts according to the colors they saw. Some parts had more than one color so they needed to justify why they placed it within a particular group.
The Body Metaphor
Once everything was taken apart, I actually had to consult with our Associate Director of IT to make sure I had all the parts straight. Luckily he has a daughter in Pre-K so we invited him in to her class as our expert! In this final stage, I wanted students to compare the various parts of a computer to a part of our own bodies. Equipped with an outline of one of my students on butcher paper and printouts of various body parts and items, we inquired into which parts of the computer would most likely match parts or aspects of our body. There was only one thing that wasn't related to a body part which was the fan. We discussed that it was a tool to help our bodies stay cool when we feel very warm. The following were used as connections:
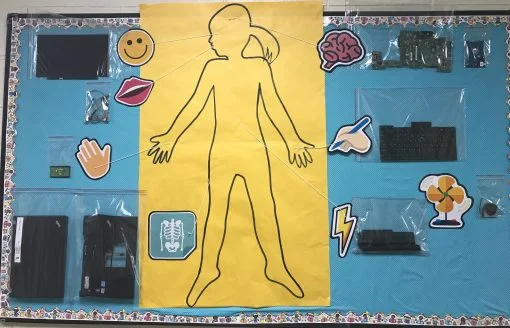
Brain - Motherboard/Hard Drive (controls other parts and stores memory)
Face - Screen (how we can see or understand what the computer is thinking/doing)
Mouth - Wires (various parts talk to each other)
Hand - Trackpad/Mouse (how we move things on the screen)
Hand with a pencil - Keyboard (how we write words and symbols)
Lightning bolt (energy) - Battery (we eat food to gain energy, a battery needs to be charged with electricity to maintain energy)
Fan - Fan (to cool)
Outer shell/Case - Skeleton/Bones (protects all the parts and holds things together)
There were many other pieces to the computer but we felt that these were the key parts that our young students could relate most to. When we were done each student got to choose their favorite part and talk about what they now knew about that part of the computer.
Overall, I'm really excited to continue exploring other things with my Pre-K students by taking them apart! I've got two wall clocks just waiting to be opened up ;)