3D Printing in Early Childhood
Embracing the Challenge
We all know that the advancements in technology will never be at a stand still, and as a result, the place of technology in education evolves at a significantly fast pace. Those of you who work in a similar field as I do will understand, our roles truly put the idea of "lifelong learning" to the test! I am quite fortunate, my colleague and team leader Leanne tends to act as my compass by paving the way for what I should be exploring next. In my first year as a technology integrator, Leanne was building units that incorporated 3D printing into her curriculum for grades 3-5. I absolutely love the units that she designed, ranging from the creation of key chains to the study of 3D printing in modern medicine, but the entire year I couldn't wrap my head around the relevance of 3D printing in the grades that I teach, PreK-2. Every time I came up with an idea, I challenged myself by asking, "Would it be more developmentally appropriate for students to create it with hands-on, tactile materials (i.e. play dough, cardboard etc.)?" For that entire year, the answer was always 'yes', so I never tried 3D printing with my students. However, the fact remained that 3D printing is rapidly inching its way into various fields such as architecture, fashion, and the culinary arts. There is no doubt that it continues to gain increasing relevance in the design world, so, if I wanted to give my students an opportunity to experience one way to be real designers in our world today, it seemed 3D printing might be my path.
I took on this challenge and eventually found ways to incorporate 3D printing into various parts of our Science, as well as, Engineering and Design curriculum.
KG: Looking Closely at Leaves
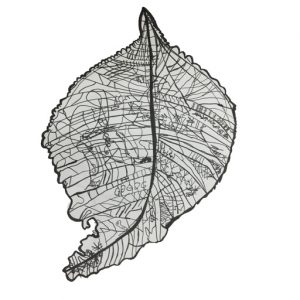
Integration into the Kindergarten curriculum was a rather loose connection, but definitely a great introduction to 3D printing. One of the Kindergarten writing units revolves around "Looking Closely" at different things and writing about them like a scientist. Many of the Kindergarten teachers like to choose leaves as one of the objects students write about, so I decided to expand this idea into the design of a 3D printed leaf. To support students looking closely at small details as well as develop fine motor skills, each class worked together to make a blown up drawing of a leaf. In order to avoid having the whole class fighting over space to observe and draw around one piece of butcher paper, I set up the class so that I had three stations for the students to rotate around. The other two stations were a Bee Bot coding station and an Engineering Design challenge with Legos (design a bridge strong enough to hold a water bottle).
For the 3D printing station, I first had students line up to take a closer look at the 3D printer itself, I pointed out the spool of filament, the nozzle and of course the bed. I also explained in rather broad terms how the 3D printer worked. As much as possible, I had the 3D printer running when I did this, but it didn't work out for every class to see the printer in action. On the butcher paper, I drew the outline leaf first to ensure that it filled the page. The first group started with pencil drawing the details of spots and veins they saw, the second group finished this process with pencil, and the last group went over all the lines and spots with black marker. Each group also had time to pass the leaf around and look closely at it so that they could do their best to recreate the patterns they saw on the leaf itself. I reminded students that if they were not careful and clear in their design, the 3D printer may not understand what they want and be unable to print their leaf. This seemed to work in encouraging students to take their time.
Ideally I wanted students to have the chance to see the process of transforming their design into a 3D file. Initially we planned to use Makerbot Printshop for this, unfortunately, the drawings came out too detailed for Printshop to work seamlessly. So, we ended up transforming their designs through the site Selva3D. The leaves came out beautifully and the kids really enjoyed seeing and touching their printed designs. We hope to extend this project to then give students an opportunity to created scaled down versions of their leaves to create pendants. This will hopefully engage students in thinking carefully about whether or not the 3D printer can handle very small intricate designs or if they should simplify the design.
G1: Cookie Cutters
In first grade, students go through the Engineering Design Process to figure out what the best recipe for making play dough is. The setup of the problem usually begins with the teacher telling the students that in their attempt to create play dough, the mixture got very lumpy or runny. To help solve this problem, students experiment with different ideas on how they should change the recipe in order to improve the consistency of the play dough. This is where 3D printing comes in! During my technology sessions, students went through the same Engineering Design Cycle in order to design a cookie cutter that they could use as a testing tool when they were learning about play dough.
In partners, students studied cookie cutters, their shapes how thick or thin they were etc. Once they had an opportunity to look at a few different types of cookie cutters, they then worked with their partner on an initial design. Students needed to agree on a shape, draw it on paper, photograph it using their iPad, and finally, use the app Cubify Draw to trace their design and turn it into a 3D file. Within the app, students had to discuss the thickness and height they wanted for their first prototype. There were a few things to consider such as the strength of the cookie cutter, while still ensuring it was thin enough to cut through thicker dough. They also had to figure out a shape that would create a strong cookie and not have any parts that may break off.
I chose around 3-4 designs to print the first time around and brought these prints to the second class. I purposely chose designs with qualities they could learn from such as, ones that were too thin (broke/cracked under pressure), too low (hard to press into thicker dough), and had skinny spaces between the edges (causes cookie/dough to easily break). I let the class pass these first prints around to feel them and look closely, then one by one I tested them with store bought play dough. Students made their observations then went back to the drawing board to redesign their cookie cutters and improve them. Here are a few examples of first and second designs on paper:
This time we printed every group's design and students had a chance to use them to make sugar cookies to wrap up the project and celebrate the successful designs!
G2: Spinning Tops
Second grade at TAS does a science unit on Balance and Motion and we integrate robotics into this unit using Lego Wedo. You can see how we do this in this post. This year I decided to take it a step further and see if students could design a 3D printed spinning top using the knowledge they learned from their science lessons and the robotics lessons. One concern expressed by the second grade team was the amount of plastic it would use up and also the time it would take if all students printed their own tops twice. So, we had students design and improve individually, but when we printed tops, we came together as a class and designed one top as a class. Each class ended up with 2 prints, an initial print and then a second print which was improved based on what we learned form the first top.
For this activity we used the app Revolved, what this allows students to do is to design 3D models that revolve around an axis. This was an interesting exercise in perspective! Students first had to design individually on Revolved, then they had to save their design as a photo and import it into Seesaw to record a reflection on why they designed their top the way that they did.
[video width="1920" height="1080" mp4="http://mspanasays.com/wp-content/uploads/2016/05/3D-top-design-1.mp4"][/video]
The class then came together and we all collaborated on a single class design . This discussion actually took 15-20 minutes because students debated ideas with each other and brought up a lot of concepts they had learned from their science lessons. They debated weight distribution, thickness and height of the handle, whether or not to have a curved base or a pointed base, among many other ideas. Many elements of the class design needed to be voted upon to make decisions. Here are a few examples of class designs in Revolved:
The first class design was printed and brought back the following lesson to be tested. I also shared other class designs so they could learn from them and help inform each student's second design. one of the key things that students learned about during this test was not just which shapes worked well but also about printer error and what our 3D printers could and could not handle. We went through the same process again where students got a chance to design individually on Revolved and explain their thinking in Seesaw. Then we came together and worked on improving our top design as a class. Here is an example of a student's second design. This comes from the same student whose example is shown earlier.
[video width="1920" height="1080" mp4="http://mspanasays.com/wp-content/uploads/2016/05/3D-top-design-2.mp4"][/video]
In the final lesson, the students got the chance to view and test both their first and second class designs, then wrapped up the project by writing a reflective blog post comparing the two tops. Here are a few examples of first and second designs:
There you have it, 3D printing from Kindergarten to 2nd grade! I would love to hear other ideas of how you have incorporated 3D printing into your lower grades so do share!